
TL;DR

Get art and craft supplies delivered free with Prime
- Fast, free delivery on millions of items
- Prime Video, Amazon Music and more included
- Member-only deals all year
Moving your rig into a closet can silence noise, but it requires thoughtful placement, proper acoustic treatment, and ventilation. A sealed closet traps heat, so airflow and insulation are key to a quiet, cool setup. This guide covers everything you need to create a practical, effective closet studio.
Ever wondered why your closet sounds so echoey or why your noisy AI rig doesn’t bother you when it’s tucked away in a closet? The secret lies in understanding how sound travels and how to control it with smart placement and simple acoustic fixes. This isn’t about expensive foam panels—it’s about working with what you have, and knowing what really makes a difference.
If you’ve got a small space and want to turn it into a quiet recording booth or a discreet server nook, this guide is your new best friend. We’ll cover how to silence noise, control reflections, and keep your gear cool—all without breaking the bank or making permanent changes.
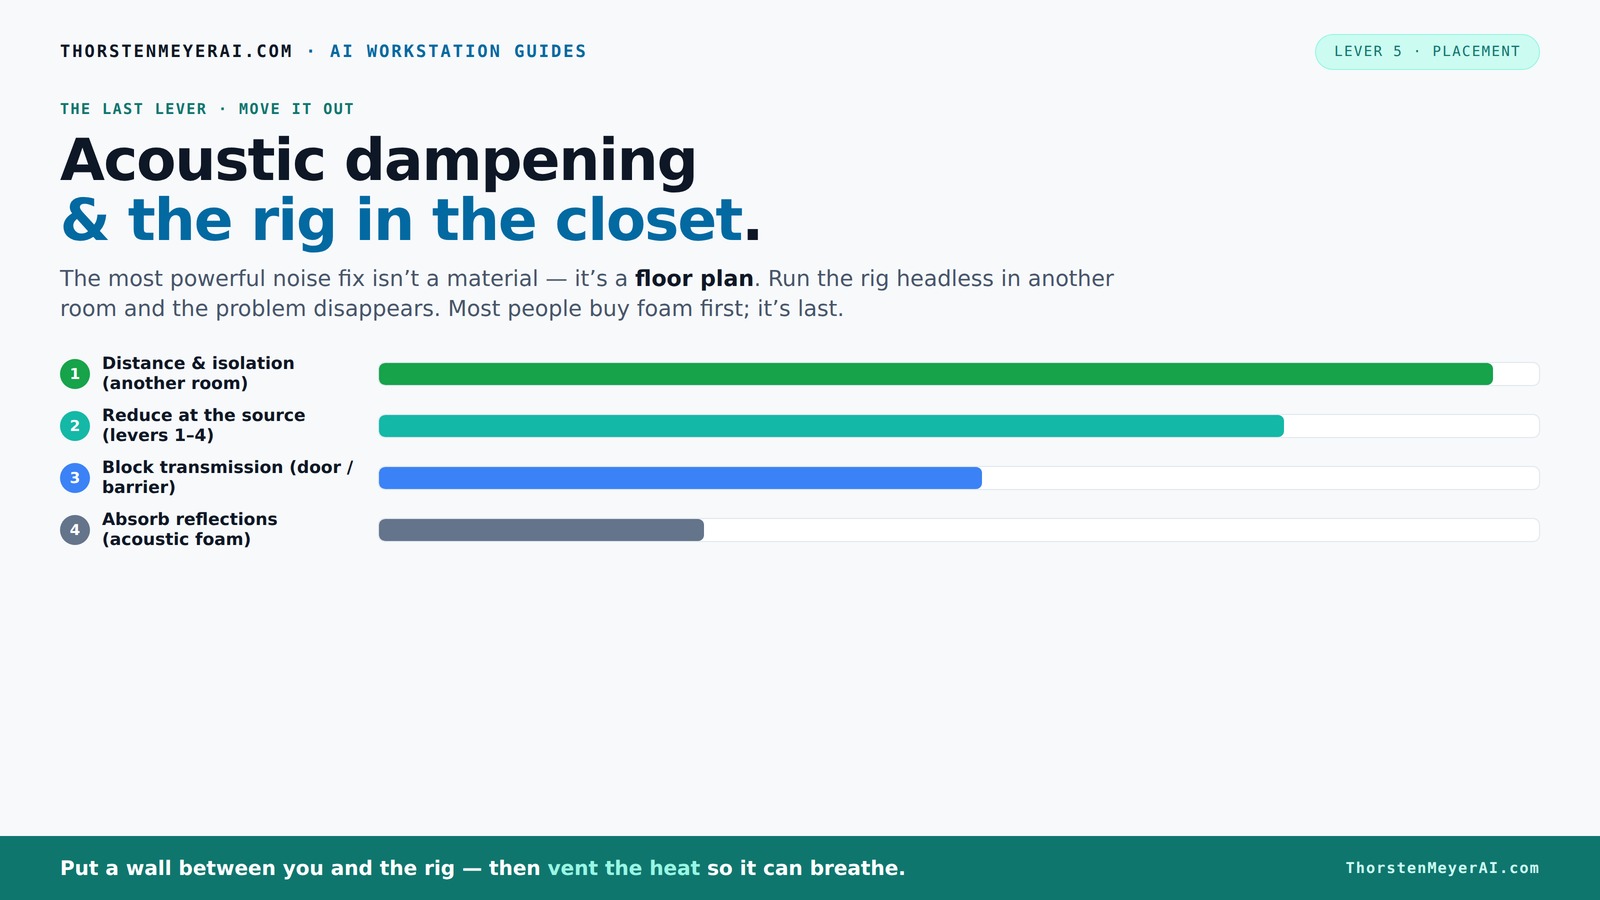
Acoustic dampening
& the rig in the closet.
The most powerful noise fix isn’t a material — it’s a floor plan. A rig you can’t hear because it’s in another room beats any amount of foam. Tap the approaches in Part 1 to see what actually works.
(another room)
(levers 1–4)
(door / barrier)
(acoustic foam)
Contain the noise, not the heat
Key Takeaways
- Moving your rig into another room is the most effective way to silence noise and control heat.
- Proper ventilation and airflow are critical when placing equipment in sealed spaces like closets.
- Sealing gaps and leaks around doors and outlets dramatically reduce airborne noise transmission.
- Focus on placing acoustic treatments at reflection points—behind the mic and on nearby surfaces—to cut echo.
- Bass traps in corners help tame low-frequency boominess in small spaces, improving overall sound clarity.
acoustic foam panels for home studio
As an affiliate, we earn on qualifying purchases.
As an affiliate, we earn on qualifying purchases.
Why Moving Your Rig Is the Easiest Sound Solution
The best way to quiet a loud rig? Put it somewhere else. Sound and heat are best managed by distance. When your AI workstation lives in another room, the noise simply doesn’t bother you anymore. It’s like magic—no need for foam or barriers.
Imagine your rig in the laundry room, behind a closed door. You SSH into it, and the noise stays perfectly on the other side of the wall. Your desk stays silent, and your workspace remains distraction-free. Plus, you avoid the headache of cooling in tiny, sealed spaces.
All you need is a reliable wired network and a well-ventilated spot. Moving the rig takes effort upfront, but it’s by far the most effective fix for noise and heat.
As an affiliate, we earn on qualifying purchases.
The ‘Rig in the Closet’ Setup — Why It Works and What to Watch Out For
Placing a high-power rig inside a closet can dramatically cut noise. No more roaring fans echoing through your apartment. But there’s a catch: heat. For serious quiet and cooling, consider a purpose-built soundproof cabinet with ducted airflow. Enclosing a 600W GPU without airflow turns into an overheating oven.
To make it work, you need active ventilation—think of vents or a quiet exhaust fan. For serious quiet and cooling, consider a purpose-built soundproof cabinet with ducted airflow, which can keep noise down to around 36 dB while dissipating heat effectively [1].
Remember: sealed spaces trap heat. Without proper airflow, your rig will throttle or shut down. Use a thermostat-controlled fan, or better yet, a liquid cooling setup with radiator exhaust [3].
As an affiliate, we earn on qualifying purchases.
Soundproofing vs. Acoustic Treatment — What's the Real Difference?
Soundproofing and acoustic treatment are often confused, but they solve different problems. Soundproofing blocks sound from leaving or entering a space—think of sealing gaps and adding mass. Acoustic treatment reduces echo and harsh reflections inside a room, making it sound better for recording.
For your closet, sealing gaps with weatherstripping and adding dense materials like drywall with damping compounds (e.g., Green Glue) helps with soundproofing. Inside, acoustic panels and blankets absorb reflections, reducing echo and harshness.
Here’s a quick comparison:
| Soundproofing | Acoustic Treatment |
|---|---|
| Stops noise from escaping or entering | Improves sound quality inside the space |
| Uses mass, sealed doors, barriers | Uses foam, panels, blankets |
| Requires structural changes or heavy materials | Simple to add, temporary or movable |
As an affiliate, we earn on qualifying purchases.
Where to Place Acoustic Panels for the Best Effect in a Closet
Placement is everything. To reduce reflections, position absorption right behind your microphone and on nearby reflective surfaces. You can learn more about acoustic treatment placement for best results. The goal: stop sound waves from bouncing into your mic.
For small closets, focus on the reflection points—mirror the mic’s position and find the surfaces that reflect sound directly back. Use inexpensive foam panels or thick blankets to cover these spots.
If the closet is large enough, add bass traps in corners to tame low frequencies that cause boominess. Remember: more coverage beats perfect symmetry in tiny rooms [4].
How to Reduce Echo and Make Your Closet Sound Less ‘Boxy’
Small rooms often sound ‘boxy’ because sound bounces between hard surfaces. To fix this, add soft, thick materials where reflections happen most—behind the mic, on the ceiling, and on the side walls.
Use moving blankets, thick foam, or reflection filters—these are quick, cheap fixes that absorb echoes. For more control, place foam panels at reflection points, especially near the ceiling and walls facing the mic.
In tight spaces, stacking blankets or thick curtains on the closet door can dampen sound further. For more tips, see acoustic dampening techniques. Remember: covering every surface is less important than targeting the main reflection points.
Low-Frequency Control in Small Spaces: Do You Need Bass Traps?
Bass buildup is common in tiny rooms because low frequencies tend to bounce around and create boominess. Adding bass traps in corners can soak up this energy, making your recordings clearer.
If your closet has noticeable low-end issues, invest in thick bass traps or dense foam blocks in the corners. Don’t forget: even small spaces benefit from targeted low-frequency absorption [4].
Otherwise, you might notice a muddy sound that’s hard to fix with just panels. Bass traps are your secret weapon against ‘boomy’ vocal recordings or muddled AI outputs.
What’s the Best Way to Seal Gaps and Stop Unwanted Noise Leaks?
Gaps around doors, outlets, and vents are sneaky noise leaks. Seal them with weatherstripping, acoustic sealant, or draft stoppers. These small fixes have big impacts on reducing airborne noise entering or leaving your closet.
For doors, a simple draft snake or door sweep can cut noise significantly. For outlets, use foam gaskets or put acoustic putty behind plates. These quick fixes can make your setup much quieter without expensive renovations.
Remember: sealing gaps is the first step before adding absorptive materials for internal reflections.
Can a Reflection Filter Replace Full Acoustic Treatment?
A reflection filter is a handy tool, but it’s not a full solution. It helps isolate your mic from room reflections but doesn’t address room echoes or low-frequency issues.
If you’re tight on space or don’t want to make permanent changes, a good reflection filter can significantly improve vocal quality. But for a truly professional sound—especially in a small, reflective closet—you’ll need a combination of absorption and proper placement [4].
Think of it as a piece of the puzzle, not the whole picture.
Frequently Asked Questions
What's the difference between soundproofing and acoustic treatment?
Soundproofing blocks sound from passing through walls, doors, or gaps—think of thick drywall, seals, and barriers. Acoustic treatment, on the other hand, improves sound quality inside a space by absorbing reflections and reducing echo—using foam panels, blankets, or diffusers.
Can I really turn a closet into a usable vocal booth?
Yes, with some strategic treatment and sealing. Focus on absorbing reflections, sealing gaps, and adding bass traps if needed. It’s not a perfect studio, but it can be a highly effective, budget-friendly solution for vocals or voiceovers.
Should I seal gaps or add panels first?
Start by sealing leaks around doors, outlets, and vents. Once sound leaks are minimized, add acoustic panels to control reflections and echo. Sealing gaps often yields the biggest immediate noise reduction.
Do foam panels block noise or just reduce echo?
Foam panels primarily reduce echo and reflections inside a room—they don’t block sound passing through walls or doors. For sound blocking, you need barriers or sealing solutions.
How many panels do I need for a closet booth?
It depends on size, but a good rule is covering at least 30-50% of reflective surfaces. Thicker panels (2-4 inches) absorb low frequencies better, especially in small spaces. Focus on reflection points for maximum impact.
Conclusion
Silencing a noisy rig or creating a little recording nook in your closet isn’t magic—it’s strategy. Moving equipment away, sealing leaks, and treating reflections make the biggest difference. And don’t forget: ventilation keeps your gear cool and happy.
With these simple fixes, your closet can become a quiet, productive space—without the permanent renovations or budget-busting gear. The right placement and a few smart tweaks make all the difference. Now go turn that noisy closet into your perfect studio sanctuary.
Halloween Picks
halloween
As an affiliate, we earn on qualifying purchases.